Courier

Spacecrafts, buildings and other 3D asset creation
Keeper
Posts: 97
Joined: Thu Jan 04, 2018 9:23 pm
Location: Indian Hills, Nevada, USA
Contact:

Re: Courier

Post by Keeper »

Downloaded the Skipjack and made some texture improvements -- specular lighting, darkening the tyres and inside of the thrust cones, and making the stripes a pattern so each Skipjack will have differently coloured stripes.

http://www.keeper1st.com/pioneer/skipjacktexes.zip

Try these files and see what you think. (I've actually edited a lot more ship textures since the package of mine that was put into the main game... I've found a better way to do patterns without bleeding.)

Image
impaktor
Posts: 992
Joined: Fri Dec 20, 2013 9:54 am
Location: Tellus
Contact:

Re: Courier

Post by impaktor »

Hey!

Do you like doing textures?*

We need texture-people.

*asking for a friend.
bobtheterrible
Posts: 148
Joined: Sat Jan 24, 2015 8:03 pm

Re: Courier

Post by bobtheterrible »

Keeper wrote: Sun May 03, 2020 10:58 pm Downloaded the Skipjack and made some texture improvements -- specular lighting, darkening the tyres and inside of the thrust cones, and making the stripes a pattern so each Skipjack will have differently coloured stripes.

http://www.keeper1st.com/pioneer/skipjacktexes.zip

Try these files and see what you think. (I've actually edited a lot more ship textures since the package of mine that was put into the main game... I've found a better way to do patterns without bleeding.)

Image
Hi Keeper!

Many thanks for touching up the tyres and drive cones - I kept thinking about doing them but I was starting to suffer from fatigue by the end... My one suggestion would be not to have cones so dark closer to the rim? As they are, it is difficult to tell that they are hollow as the black is vey deep.

1) What did you do to improve the specular lighting? I had included a spec but I will be honest that Im not an expert and wasn't sure how if it was doing the job as intended.

2) How do we do patterns?? The decals in the original texture were the ones I baked down back in 2017 before I lost my repo. How did you extract them out?? This is awesome by the way!

Bob
Keeper
Posts: 97
Joined: Thu Jan 04, 2018 9:23 pm
Location: Indian Hills, Nevada, USA
Contact:

Re: Courier

Post by Keeper »

Most of the cones, except the ones in the rear, do have a bit of shading toward the front. The rear ones I couldn't find the exact mapping so just made the whole area dark with "noise" to give it some texture. To extract the pattern I just used Magic Wand tool and some hand-grabbing of the "red" bits in the original texture and copied them to the Alpha of the pattern texture which otherwise is a plain white, then adjusted contrast so the "clean" bits are white in the Alpha and the "dirty" bits or lines are dark, which make the paint imperfect and allows the "dirt" on the texture to appear over the paint more realistically. (And then of course desaturated and lightened the red parts of the main texture so the pattern colors aren't applied on top of red.)

To do multiple colors there are three levels that would be used in the RGB texture (for those such textures, I use only Red values, with Green and Blue at zero, to avoid any color drifting problems with the DXT5 conversion that otherwise would occur). These work best if the multiple colors are in different parts of the texture file, so they don't have to touch one another. Using a big "blob" in the RGB part of the texture and putting the actual pattern detail in the Alpha creates the best results.

The specular map you included only did a little bit of shine to worn areas around the rear drive cones, pretty much. The new map allows the entire ship to react to light (except parts that shouldn't), and the color pattern area is a little stronger so the painted lines appear a little shinier than the rest.

And yes, I do rather like doing textures (or at least improving them), as should be evident by the dozens of texture changes I've posted about over the years, and more still I haven't but just do for my own visual enjoyment. I don't really understand github so I'm left just to post them here or enjoy them myself -- rather like the hundred or so grammatical and spelling improvements I do to the game text.
bobtheterrible
Posts: 148
Joined: Sat Jan 24, 2015 8:03 pm

Re: Courier

Post by bobtheterrible »

Having the ability to change colour in game is really nice. Im happy with those texture modifications, tho I don't hold the keys so would need someone to bring them in to the PR.

The original .xcf file had everything broken down into layers; base colour, panel lines, dirt and decals. The dirt was painted on via fingertip while the panel lines and decals were managed via "paths". The idea was that I could change the decals later if I wanted. Unfortunately I could only recover an older version of the .xcf that only had a partial set of decal paths (also appears to be missing some dirt!). At some point I was going to go back and retrace the paths from the final png so that I could separate out the decals but I just wanted to get this model game worthy before something else took me off track.

If you are interested in how I put that png together you can find the GIMP .xcf file here:
https://github.com/BobTheTerrible/pione ... _ao_hr.xcf

Bob
Keeper
Posts: 97
Joined: Thu Jan 04, 2018 9:23 pm
Location: Indian Hills, Nevada, USA
Contact:

Re: Courier

Post by Keeper »

I could copy over the missing "dirt" from the final and put it back into the dirt layer, if there are other paint designs you want to be able to make for it.

I was just playing with it in the modelviewer and notice that the maneuvering thrusters aren't animating. Someone who knows how those work might want to take a look at that.

Oh, have you thought about adding any lights to the ship? I've just made lights in the round windows on those side doors, and two curved rectangles in the front which were slightly yellow in the texture to begin with. Not sure what that circular greeble is supposed to be, but I made the yellowy bits into glowing lights anyway, for now...
Image
nozmajner
Posts: 1079
Joined: Mon Jul 01, 2013 3:25 pm
Location: Budapest HU

Re: Courier

Post by nozmajner »

The thrusters are working on my end properly, but I'll check.
And I'll add the texture improvements as well.
bobtheterrible
Posts: 148
Joined: Sat Jan 24, 2015 8:03 pm

Re: Courier

Post by bobtheterrible »

Thanks Keeper,

I think adding glow to the porthole on the door would work. The greeble at the front was meant to be the missile/probe launcher so wasn't intending glow there. However the sensor(s) in the middle could be a nice target for some glow? Something Noz suggested was to add heat sinks to the nacelles. I had purposely left the panels on side intakes blank incase I had the time to add heat sink/vent decals and normals - possibly glow here if you want to attempt that?

Rather than copying the dirt from the original image, give me a couple of evenings and I will add it back using my already established methods to ensure some sort of consistency.

Having some additional pattern designs would be great. My initial design was heavily influenced by concept are supplied by Noz way back in the thread:
Image
Image
Image
Image
There is also an option to pattern-up the secondary colour:
Image Image Image
I Lost the paths for these but I simply followed existing panel lines so they should be simple to put back in :)

p.s. I just noticed that I have an eraser mark on the pattern in top of the nacelle air intake...
Keeper
Posts: 97
Joined: Thu Jan 04, 2018 9:23 pm
Location: Indian Hills, Nevada, USA
Contact:

Re: Courier

Post by Keeper »

I noticed that light blue around the texture. I could recapture that as a pattern. I'd need to re-do the specular map in that case as currently it only works with the one pattern made so far (I made it so the pattern is a little shinier than the rest of the ship, but obviously if there's another pattern that wouldn't match).

If you update things I'll get back to fiddling with it.
nozmajner
Posts: 1079
Joined: Mon Jul 01, 2013 3:25 pm
Location: Budapest HU

Re: Courier

Post by nozmajner »

Regarding the workflow work I'm doing.
I just put up 
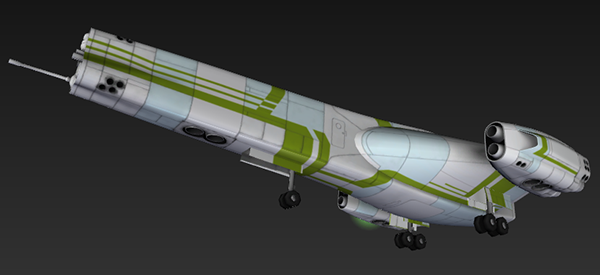
the first test run of it on github. An escape capsule for an upcoming mission. It's up on sketchfab as well with the full res textures.

The small details are all baked from decals, and I've used some material layering trickery for the weathering/fading of paint, and had to convert the roughness map into specular. It needed a bit of touch-up in Krita, but mostly because I had to combine two maps, and handpaint some local colors here and there.
Puting on the decals is a bit finicky, but not worse than doing them in a 2D program. Easier, I would say, in most cases. I've used decalMachine for it, which is a paid add-on, so that's not ideal. But it can do all the placement, projection and baking on it's own, and decals can be created with it as well.

So I'd say it's a step up in texturing, much easier and more fun to do it, even with the finickiness of the addon here and there. The shader setup has some kinks in need of ironing out, but nothing drastic. Mostly usability stuff, and some simplification. And the baking of maps from there was rather straightforward thankfully.

I think the next step for me will be to creat a new ship from the ground up, and documenting the process. And then we can iron out the kinks and optimize.
Post Reply